Table of Contents
ToggleWordPress Statistics
- WordPress powers 43.3% of all websites on the internet (W3Techs).
- Among the top 10 million websites, over 500 new sites are created daily using WordPress (WP Engine).
- More than 80% of WordPress sites are running Version 6 (W3Techs).
- WordPress offers over 30,000 themes (WP Zoom).
- The platform has around 60,000 free plugins in its plugin database (Colorlib).
Top Read: Common Road Blocks in Migrating to Shopify from WordPress
Why You Should Consider Moving Your WordPress Site to Shopify
User-Friendly Interface
As earlier noted, Shopify enjoys a very simple and easy user interface that makes it easy for users to work on it irrespective of their experience in programming. Unlike WordPress in which one would need to know about plugins, themes, and even coding at times, Shopify makes it easy and simple backed by simple tools and easy installation.
Built-In E-commerce Features
Even though WordPress is a rather flexible content management system, it lacks some features, and one of them is e-commerce. Joomla is a content management system while Shopify is mainly for e-commerce because it has integrated tools for products, orders, stock, and payments. This approach can be beneficial as it eliminates the need to use several applications to manage an online store.
Security and Reliability
To further protect your customers’ data, Shopify has SSL certificates and is PCI compliant. Also, it eliminates issues with site hosting, regular updates, and maintenance common in WordPress-based stores and websites developed with custom solutions.
Scalable Solutions
Thus, the rate of growth of your business is not a concern when using Shopify since it is developed to handle large traffic and sales. It is scalable which will prove efficient as the business expands since its infrastructure can accommodate high-volume operations.
Shopify Pre-Migration Checklist

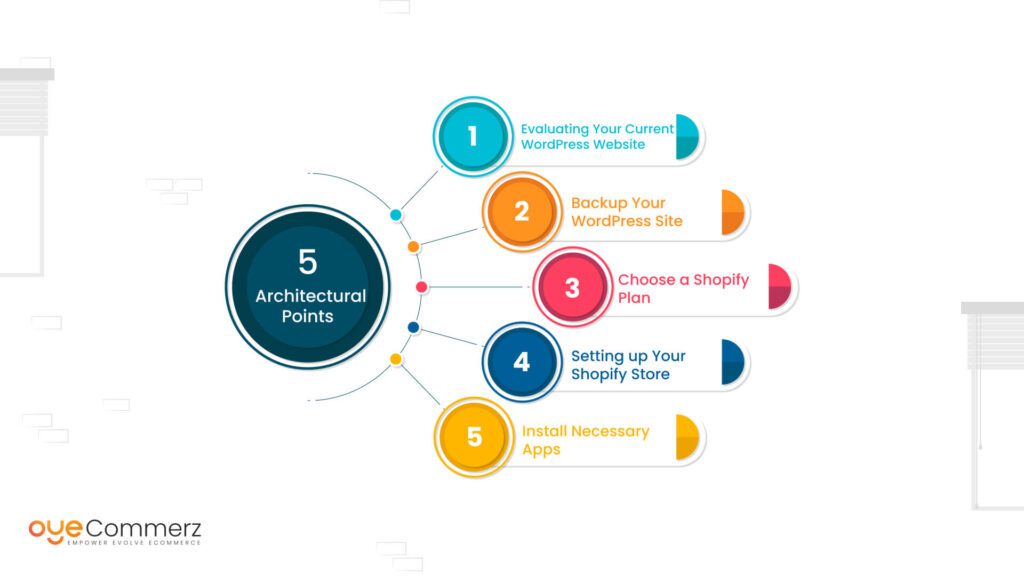
1. Evaluating Your Current WordPress Website
Before converting, there is a need to audit the existing WordPress site. Specifically, find out what customizations, plug-ins, and functionality you would like to maintain. This step will assist you in the planning of the migration process and nothing critical in your business will be left behind.
2. Backup Your WordPress Site
Full backup of your WordPress website is mandatory. This encompasses your database, files, themes, and plugins among other components. This is important if something wrong happens in the course of the migration, the backup can be used to bring the site back to the state that it was before the migration.
3. Choose a Shopify Plan
Choose a Shopify plan that is suitable for your business. There is always a plan for Shopify that matches the budget and necessary features in every store. Elements like transaction costs, staff reimbursement, and elaborate reporting interfaces should also be taken into account.
4. Setting up Your Shopify Store
Sign up for Shopify and develop the retail outlet. Your store name, your currency, and the payment options that you have with your merchant services are basic settings. Find your way around the Shopify dashboard and what you require from it, to ease your move to Shopify.
5. Install Necessary Apps
When it comes to the additional features there is nothing better than Shopify App Store that contains apps to enhance your store’s capabilities. Determine the applications that can imitate the peculiarities of your WordPress website. For instance, if you employed a particular SEO plugin within WordPress, search for a similar app in Shopify.
How to Move Custom WordPress Features and Functionality to Shopify

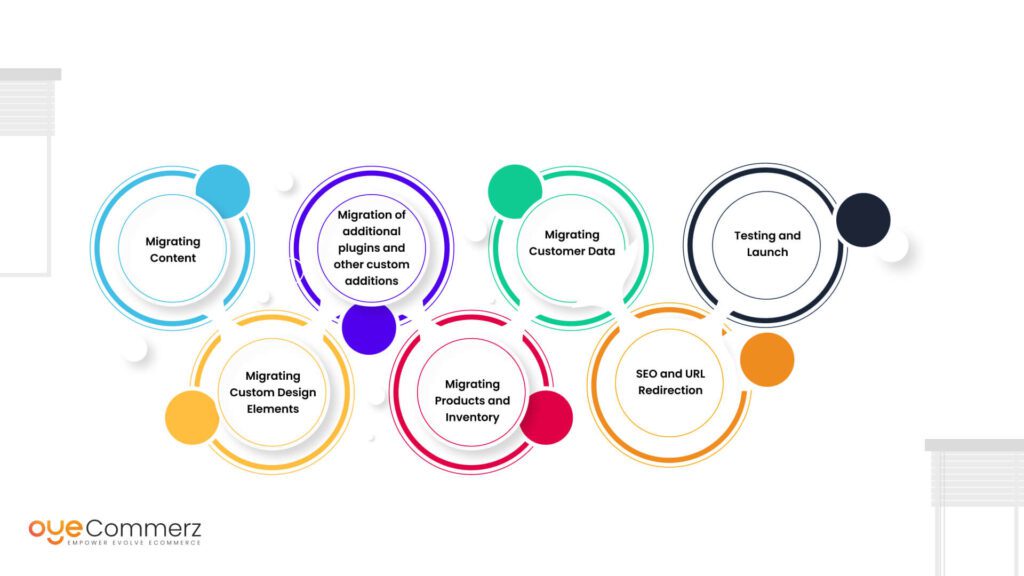
1. Migrating Content
-
Exporting WordPress Content
To transfer your blog from WordPress to Shopify go through the following steps; export WordPress data. WordPress comes with a feature where one can export his/her posts, pages, and media files in an XML format. To export the content, go to the WordPress dashboard, then to “Tools” > “Export”, where you choose what to export.
-
Importing Content to Shopify
Shopify has a feature where one can easily transfer content from other sites to theirs. To this, navigate to the Shopify admin panel and click on the “Apps” option, then on the “Store Importer” option which will guide you through the process of importing your XML file. This process will migrate your published articles, pages, and your media files into a Shopify site.
2. Migrating Custom Design Elements
-
Choosing a Theme
Regarding the themes, Shopify provides free and paid options, and the choice is rather vast. Select a theme that you identify with the appearance of your WordPress website. You may not necessarily get a look that is similar to the one you want in your exact theme but most themes come with a lot of options and thus can be made to look almost identical to the one you may want.
-
Customizing Your Theme
After choosing the theme, you can use the available options on Shopify to change the general appearance. This might involve having the content colored, sized, and arranged in a similar way to your WordPress site. There is a drag-and-drop interface of the editor which lets users engage with the theme without actually writing code.
3. Migration of additional plugins and other custom additions
-
Identifying Essential Plugins
Enumerate the basic plugins for the given WordPress site and any other custom functionality you have. Which ones you must have for your e-commerce business and search for corresponding applications in Shopify? For example, if you have a plugin for search engine optimization, then look for an SEO app on Shopify that provides similar functionality.
-
Installing Shopify Apps
Next download the related apps from the Shopify app store to achieve a similar functionality to the installed WordPress plugins. As earlier highlighted, some of the frequent areas of application are SEO, Email Marketing, Inventory, and Analytical control, and Social Media. As for app replacements, their situation is quite favorable because Shopify hosts an App Store with a lot of apps.
4. Migrating Products and Inventory
-
Exporting Products from WordPress
However, if you are operating your stores through WooCommerce in a WordPress environment you can export your products in CSV format. This solution can be performed in WooCommerce, by choosing the area “Products” and “Export,” and then, defining the data to export.
-
Importing Products to Shopify
The CSV file import function enables you to bring your products onto the Shopify platform from another list. In the Shopify admin panel go to products click import and select your CSV file. Make sure that all the fields are mapped correctly, and all the product information is passed correctly to the target system.
5. Migrating Customer Data
-
Exporting Customer Data
Back up your customers in WordPress or Woocommerce – go to the “Users” or “Customers” option and click “Export”. Export it to a format that can be analyzed easily such as Comma Separated Value (CSV).
-
Exporting The Customer Data To Import It To Shopify
There is an instrument on Shopify that allows for customer data importation. Navigate to the “Customers” tab and click on ”Import customers” to upload the desired CSV file. Check the entire fields correspondingly so that the name of the customer, his e-mail address, and other details as well as the details of purchases should be mapped properly.
6. SEO and URL Redirection
-
Maintaining SEO Rankings
The process of migration also should have the minimum impact on the positions in the search results. Meta tags, alt tags of images, and URL aliases are some of the SEO options you have in Shopify to customize and improve the store. Make certain that all SEO features, that exist on the WordPress website, are copied to the Shopify store.
-
Setting Up URL Redirects
Probably the greatest yet ignored area in migration is URL re-directs in order to keep redirecting traffic and SEO rankings. Incorporate the Shopify URL redirect function that helps translate your old WordPress URLs to the new Shopify URLs. It makes sure that end users and different search engines are led to the right pages on the site.
7. Testing and Launch
-
Testing Your Shopify Store
Before getting your new Shopify store live, you should ensure the site has been through its test run. Test the external components of a site such as foreign elements, and links, and confirm certain layouts or designs. It is done to ensure that any problems are resolved before going live to the public.
-
Launching Your Store
After you have made changes throughout the Shopify test environment and you’re ready, you can go live. Change the DNS settings of your domains to point to the new Shopify store and communicate this Change to your clients. After launching your store, you should pay close attention to the functioning of your business.
Accelerate Your Online Store with OyeCommerz!
With OyeCommerz, effortlessly transition to Shopify while keeping your store operational and ensuring customer satisfaction. Our customized migration strategy protects your SEO, improves user experience, and unlocks Shopify’s robust features.
Rely on OyeCommerz for a hassle-free move to an exceptional e-commerce platform, where business management becomes easier and growth opportunities abound. Upgrade with us and see your online store flourish on Shopify.
Contact us today to embark on your migration journey!
Contact to Migrate your Site to Shopify Now
Conclusion
Transferring most of the program and other functionalities built with WordPress to Shopify is time-consuming and requires strategies. While reformatting, it is easy to make small mistakes that would alter the feel of a site, however, by following the steps highlighted in the guide, you can maintain the spirit of the site, by avoiding the key pitfalls of redesigning a site. Shopify has ease of use, powerful tools for running an online store, and offers solutions for businesses that are perfect for growing their online sales. By following the steps listed above a new Shopify store can provide a better experience for both the owner and the consumers.


