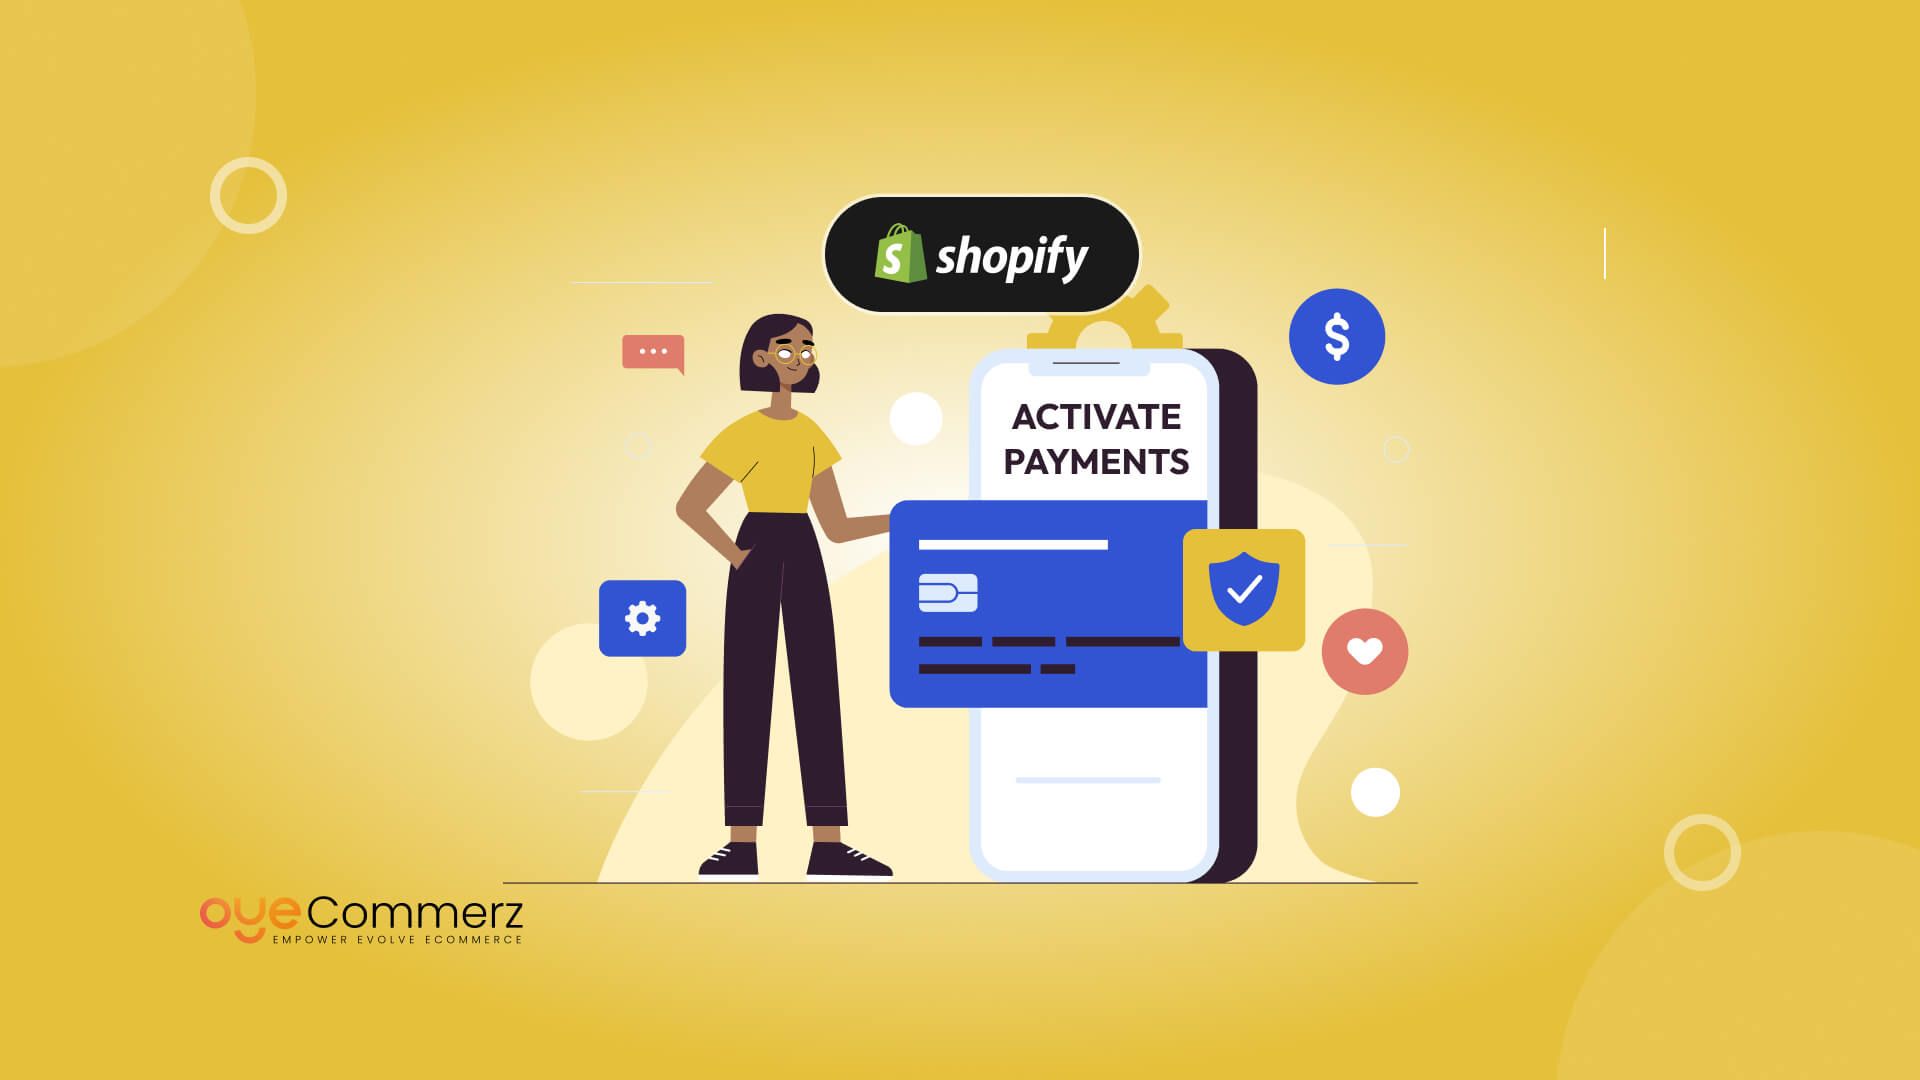
When you’re launching your online store, getting paid smoothly is non-negotiable. That’s why learning How to Activate Shopify Payments should be one of your first priorities. A seamless checkout experience not only builds trust with your customers but also helps you get your earnings faster.
In this guide, we’ll walk you through everything you need to know step by step, in plain, simple language. No tech jargon, no confusion. Just clear answers.
Shopify Payments, the platform’s built-in payment gateway, is designed to make transactions smoother, faster, and more secure. It eliminates the need for third-party processors, lowers your transaction fees, and speeds up the payout process.
Whether you’re just starting out or optimizing an existing store, activating Shopify Payments is your ticket to a more professional and profitable setup. Let’s break it down together so you can start selling smarter, and get paid quicker.
Table of Contents
ToggleWhy You Should Activate Shopify Payments Today
Picture this: You’ve just launched your dream online store. Orders start trickling in, and everything feels exciting, until you hit a roadblock with setting up a third-party payment gateway. Confusing interfaces, hidden fees, delayed payouts, it’s a vibe killer.
That’s why knowing how to activate Shopify Payments early in your journey is more than just a technical step, it’s a smart business move. It removes the friction from your store’s checkout experience, making it faster and easier for customers to complete their purchase.
Smooth checkouts = higher conversions.
No extra fees = more profit for you.
No third-party headaches = more focus on growth.
The Power of Built-In Payments with Shopify
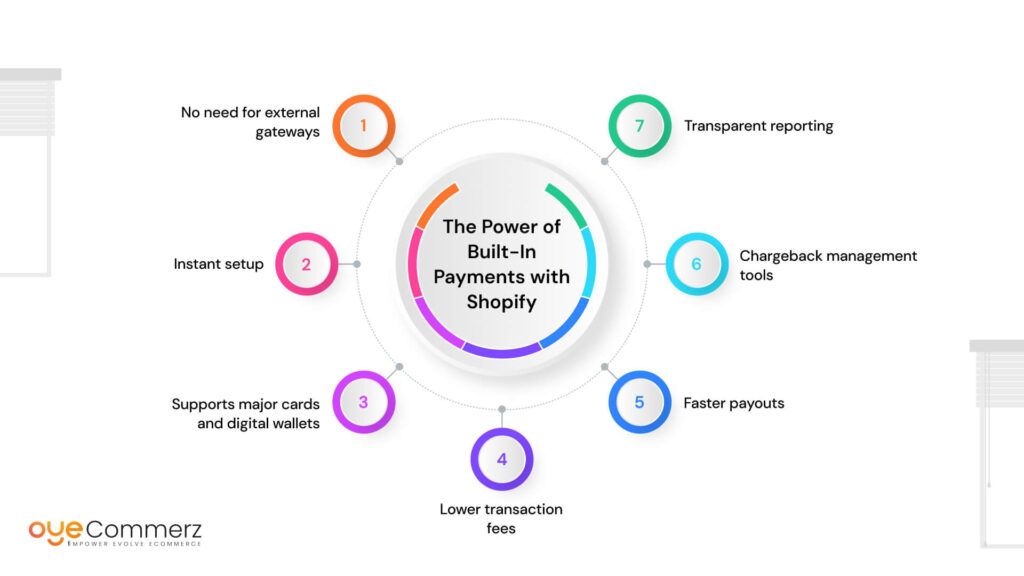
Shopify Payments is more than just a payment processor, it’s a fully integrated solution built right into your Shopify dashboard. Here’s what makes it a total game-changer:
- No need for external gateways – Everything is managed inside Shopify
- Instant setup – Start accepting payments in just a few clicks
- Supports major cards and digital wallets – Apple Pay, Google Pay, Shop Pay, and more
- Lower transaction fees – Especially if you stick with Shopify Payments
- Faster payouts – Funds get deposited into your account in as little as 1–3 business days
- Chargeback management tools – Reduce fraud and keep your revenue safe
- Transparent reporting – Track transactions and payouts from one clean interface
So if you’re aiming to create a hassle-free experience for both you and your customers, activating Shopify’s built-in payment system is the way to go. And the best part? You don’t need to be a tech genius to figure out how to activate Shopify Payments, we’ll walk you through it in the next section.
Before You Activate Shopify Payments: What to Prepare
Before diving into how to activate Shopify Payments, double-check these basics to ensure your setup is smooth and stress-free. The activation process is simple, but having everything ready can make a world of difference.
According to Shopify, stores that activate Shopify Payments within the first week of setup experience a 10–15% faster time-to-launch compared to those who delay or use third-party gateways. That means less waiting and more selling.
But here’s the catch: Shopify Payments is only available in specific countries. Some of the major ones include:
- United States
- United Kingdom
- Canada
- Australia
- New Zealand
- India
- Germany
- Japan
(For the full list, always refer to Shopify’s official documentation.)
Is Your Store Ready?
To activate Shopify Payments quickly and avoid delays, make sure you have the following essentials in place:
- A live Shopify store
Your store should be fully set up with a selected plan and products ready to go. - Business details
If you’re registered as a business, have your company name, address, and tax ID number ready. - Bank account information
This is where your payouts will go. Make sure it’s a checking account in your store’s operating country. - Personal identification
You may need to provide a government-issued ID (like a passport or driver’s license) for verification. - Tax information
In some countries, Shopify will require tax documents to ensure compliance. - A verified email and phone number
Used for security and communication during the activation process.
Having these documents and details ready not only makes the setup of Shopify Payments faster, but also ensures you don’t run into compliance or payout issues later on.
How to Activate Shopify Payments: A Step-by-Step Walkthrough
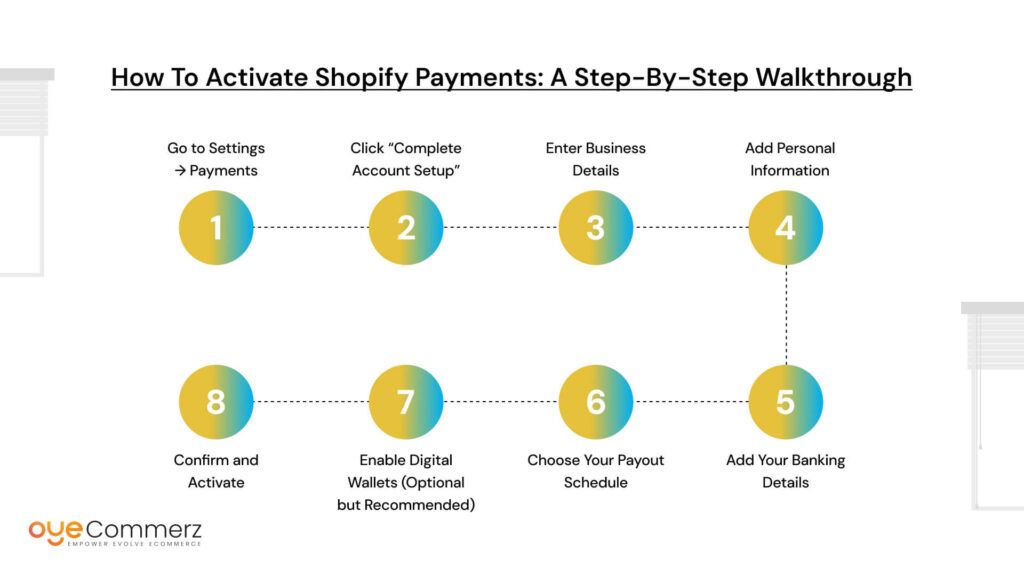
If you’re ready to start selling and collecting payments on your Shopify store, this guide is your go-to playbook. Knowing how to activate Shopify Payments means you’re just minutes away from accepting credit cards, digital wallets, and faster checkouts without dealing with third-party providers.
This built-in system simplifies your backend, boosts conversions, and streamlines your entire eCommerce process. Let’s walk you through the steps, no tech jargon, just simple clicks.
Step 1: Go to Settings → Payments
Start by logging into your Shopify admin panel.
From your dashboard:
- Click “Settings” in the bottom-left corner
- Then, select “Payments” from the settings menu
Here, you’ll see different payment providers. Shopify Payments will be listed at the top if it’s available in your region.
If Shopify Payments isn’t available, you’ll see a message saying so. In that case, consider checking country eligibility on Shopify’s official list.
Step 2: Click “Complete Account Setup”
You’ll now see a button labeled “Complete account setup” under Shopify Payments. Click it to start the process.
This is where you’ll begin entering essential details like business info, banking details, and verification documents. It only takes a few minutes if you have everything ready from our checklist in the previous section.
Step 3: Enter Business Details
You’ll first be asked about your business type:
- Individual/Sole Proprietor
- Corporation/LLC
- Nonprofit
- Other
Based on your selection, Shopify customizes the form.
You’ll need to enter:
- Legal business name
- Business address
- Phone number
- Tax ID (if applicable)
These details must match your government documents and/or tax filings to avoid payout delays.
Step 4: Add Personal Information
Whether you’re a solopreneur or representing a company, Shopify needs personal verification.
You’ll provide:
- Full name
- Date of birth
- Residential address
- National ID number or passport number (varies by country)
- Upload of your official government-issued ID
This is part of Shopify Payments’ fraud protection and compliance requirements.
Step 5: Add Your Banking Details
Now it’s time to tell Shopify where to send your money.
You’ll need a:
- Bank account number
- Bank name
- Branch code / IFSC / Routing number (depending on your country)
Make sure it’s a checking account that accepts deposits in your local currency. Using a savings account or incorrect info can delay payouts.
Step 6: Choose Your Payout Schedule
Shopify Payments gives you the flexibility to decide when you get paid.
Options typically include:
- Daily (every business day)
- Weekly
- Monthly
New accounts usually have a standard payout period of 2–3 business days. As your store grows, Shopify may allow faster options.
Step 7: Enable Digital Wallets (Optional but Recommended)
Once you’ve activated Shopify Payments, you’ll be able to toggle on digital wallet options:
- Shop Pay – Shopify’s accelerated checkout
- Google Pay
- Apple Pay
- Meta Pay
These are proven to speed up the checkout process and reduce cart abandonment.
A Shopify report found that stores using Shop Pay see up to 1.72x higher conversion compared to those without it. That’s a serious boost.
Step 8: Confirm and Activate
After entering all the required information:
- Double-check for typos
- Confirm everything matches your legal and financial documents
- Click “Submit” to activate
You’ll now see Shopify Payments listed as your active payment provider.
Shopify may take up to 24 – 48 hours to verify your details. During this time, you can still accept orders, but payouts won’t be processed until the review is complete.
How to Test Your Shopify Payments Setup
Want to make sure everything’s working?
Use Shopify’s Test Mode:
- Go to Settings → Payments
- Click “Manage” under Shopify Payments
- Scroll down and enable “Test Mode”
- Follow Shopify’s test card instructions to simulate a payment
Don’t forget to turn Test Mode OFF once you’re ready to accept real orders.
What Happens After Activation?
Once your account is verified and Shopify Payments is live:
- You’ll receive email notifications about your first payouts
- Transaction details and fees will appear in your “Finances → Payouts” section
- You can issue refunds, manage chargebacks, and view orders directly from your Shopify admin
And the best part? You don’t need to deal with separate dashboards or third-party logins. Everything runs seamlessly.
Now that you know how to activate Shopify Payments, you’re just minutes away from your first sale.
Final Tips for a Smooth Setup
- Keep your documents handy in case Shopify requests additional verification
- Monitor your payout schedule from your dashboard regularly
- Enable as many payment options as possible (cards + wallets = max flexibility)
- Use Shopify’s fraud analysis tools to protect high-ticket sales
And don’t forget, Shopify Payments isn’t just about getting paid. It’s about building trust, speeding up the buying process, and removing friction for your customers.
Practical tips to optimize your Shopify Payments experience
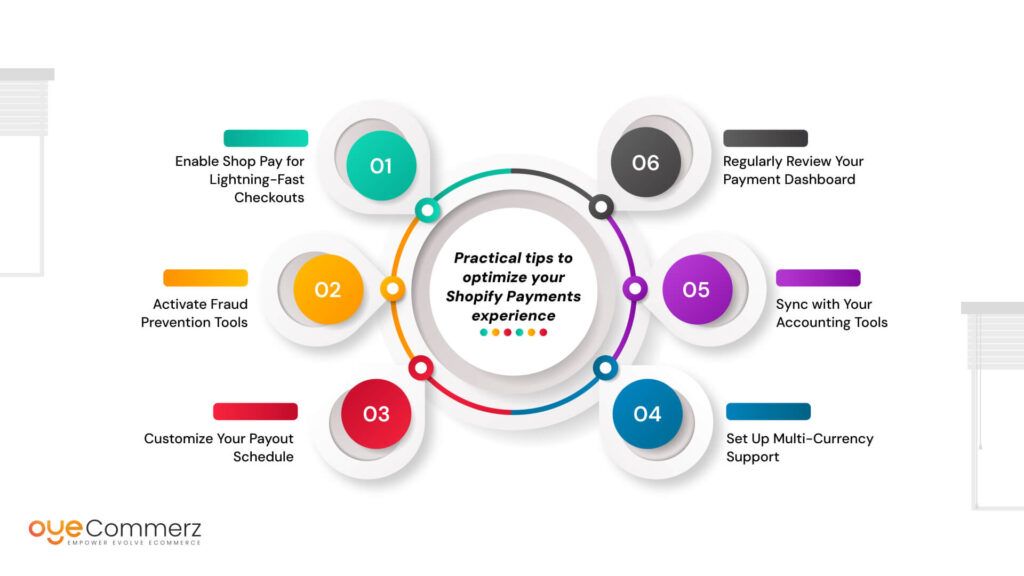
1. Enable Shop Pay for Lightning-Fast Checkouts
If you haven’t already, turn on Shop Pay in your Payments settings. It’s Shopify’s one-click checkout experience, fast, secure, and trusted.
- Shop Pay saves customer info for faster repeat purchases
- It increases trust and reduces cart abandonment
- Plus, you get access to Shop Pay Installments (buy now, pay later) for eligible merchants
Did you know? Stores using Shop Pay often see up to 60% faster checkout speeds compared to traditional methods.
2. Activate Fraud Prevention Tools
Shopify Payments comes with built-in fraud detection tools to keep your store protected:
- Risk analysis for every order
- Automatic flagging of suspicious transactions
- Option to cancel high-risk orders before processing
Stay one step ahead by reviewing flagged orders regularly and enabling email alerts for high-risk activity.
3. Customize Your Payout Schedule
By default, Shopify Payments sends payouts every business day. But you can adjust this to:
- Weekly
- Bi-weekly
- Monthly
Setting a consistent payout schedule makes bookkeeping and planning easier, especially when syncing with apps like QuickBooks or Xero.
4. Set Up Multi-Currency Support
If you sell internationally, Shopify Payments allows you to accept payments in your customer’s local currency.
- It reduces confusion and builds trust
- Prices are automatically converted using real-time exchange rates
- You can choose to display converted prices or keep your base currency visible
Test how your store appears to international visitors using Shopify’s “View as customer” preview.
5. Sync with Your Accounting Tools
Save hours of manual work by integrating Shopify Payments with accounting software like:
- QuickBooks
- Xero
- FreshBooks
These tools pull transaction data, track fees, and handle reconciliations automatically. Your accountant will thank you!
6. Regularly Review Your Payment Dashboard
The Shopify Payments dashboard isn’t just a money tracker, it’s a goldmine of insights. You can:
- Track payout status
- Review transaction fees
- Identify refund trends
- Spot your best-selling products and sales patterns
Keep an eye on your finances regularly to stay ahead and grow smarter.
With features like Shop Pay, smart fraud detection, customizable payout schedules, and multi-currency support, Shopify Payments isn’t just a tool… it’s your partner in business.
Start tweaking these features today, because the smoother your payment experience, the happier your customers (and your bank account) will be.
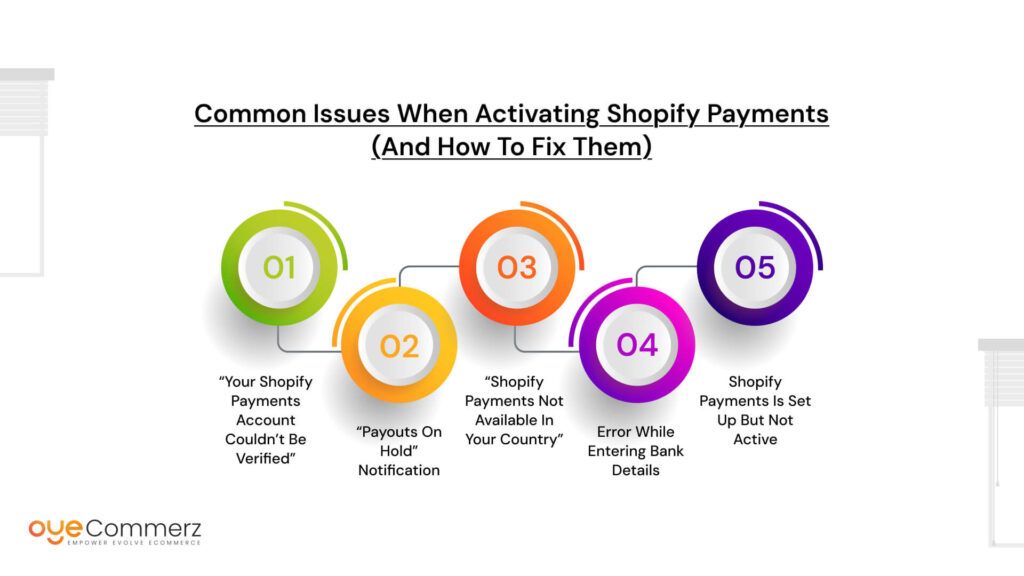
Common Issues When Activating Shopify Payments (And How to Fix Them)
Even though learning how to activate Shopify Payments is usually smooth sailing, there are times when a tiny hiccup can stall the process. Don’t worry, it happens to a lot of merchants, especially those launching their store for the first time.
Below are some of the most common issues users face during the activation process and exactly how you can fix them, quickly and easily.
“Your Shopify Payments Account Couldn’t Be Verified”
Cause: This often happens if your submitted documents don’t match the information on your Shopify account.
Fix:
- Double-check that your legal name, address, and business type exactly match your tax and banking documents.
- Upload a clear, high-resolution copy of your government-issued ID.
- If you’re using a business bank account, ensure the account holder’s name matches your business registration.
Always upload official docs in JPG or PNG format and avoid using scanned PDFs.
“Payouts on Hold” Notification
Cause: This usually means Shopify Payments has flagged a transaction for manual review or compliance checks.
Fix:
- Go to Settings → Payments → View Payouts and look for any flagged transactions.
- Reach out to Shopify Support with any requested verification documents.
- Make sure your product listings follow Shopify’s Acceptable Use Policy to avoid payout delays.
“Shopify Payments Not Available in Your Country”
Cause: Unfortunately, Shopify Payments isn’t supported in every region.
Fix:
- Visit Shopify’s country availability list to confirm your country is supported.
- If it’s not, consider trusted alternatives like PayPal, Stripe, or 2Checkout but keep in mind these may come with extra fees and longer setup times.
Error While Entering Bank Details
Cause: Typos or unsupported bank types (like savings accounts or virtual wallets).
Fix:
- Make sure you’re entering a checking account (not a wallet or savings account).
- Re-enter your routing and account numbers carefully even one digit off can cause rejections.
- Your account must support ACH transfers (in the U.S.) or the equivalent in your country.
Shopify Payments Is Set Up but Not Active
Cause: You might’ve missed the final confirmation step, or Shopify is still verifying your info.
Fix:
- Go to Settings → Payments → Shopify Payments
- Look for prompts to “Complete Setup” or upload additional documents
- It may take 24–72 hours for full verification
You won’t be able to receive customer payments until this is complete, so don’t skip any setup steps!
You’ve Got This
It’s normal to run into a speed bump or two when figuring out how to activate Shopify Payments. The good news? Most problems have quick fixes, and Shopify’s built-in tools make troubleshooting easier than ever.
With the right prep and a little patience, you’ll be all set to take payments like a pro.
Start your business journey today!
Easily set up payments, manage your store, and focus on what really matters, growing your brand.
No jargon, no hassle, just the tools you need to get started.
Join OyeCommerz today and take your store live with confidence.
Contact us now!
Let's build your custom Shopify app today!
Conclusion
Now that you know how to activate Shopify Payments, the path to a seamless checkout experience is clear. Whether you’re launching your first product or scaling an existing store, Shopify’s built-in payment system makes it easier to manage transactions, reduce friction, and keep your focus where it matters, on growth.
By enabling Shopify Payments, you avoid third-party hassles, offer faster checkout, and streamline payouts. It’s reliable, secure, and made for merchants like you.
You’ve got the platform. You’ve got the knowledge. Now it’s time to go live.Activate Shopify Payments today and let your first sale be smoother, faster, and smarter.
Your business deserves it, and so do your customers.
Frequently Asked Questions
Go to Settings > Payments, select Shopify Payments, click Activate, and fill in your business and bank details.
Activate Shopify Payments, enable Shop Pay, and offer express options like Apple Pay or Google Pay.
Go to Settings > Payments > Manage, then toggle Shop Pay ON and save.
In Settings > Payments > Shopify Payments > Manage, choose your Payout Schedule (daily, weekly, or monthly).
Head to Settings > Payments, choose a provider (Shopify Payments or others), and follow the setup steps.