
Over 4.8 million stores run on Shopify, and with competition fiercer than ever, standing out with a custom storefront isn’t just nice to have — it’s a must. Yet, 65% of store owners report struggling with technical limitations when it comes to developing or customizing their themes.
Here’s the problem: while Shopify is known for being user-friendly, theme customization can quickly become a bottleneck — especially when done manually. Editing files, deploying changes, and managing code across environments takes time, adds friction, and often leads to errors.
That’s where the Shopify Theme Development CLI steps in.
This powerful command-line interface is the secret weapon for developers and agencies alike. It streamlines theme creation, customization, and deployment, making it easier than ever to build high-performance, on-brand Shopify storefronts — whether you’re managing one store or hundreds.
In this complete guide, we’ll walk you through everything from beginner setup to advanced developer features, so you can master the Shopify CLI and build faster, cleaner, and more scalable Shopify themes.
Table of Contents
ToggleWhat is Shopify Theme Development CLI?
If you’re new to e-commerce or just stepping into Shopify development, the Shopify Theme Development CLI might sound intimidating at first — but it’s actually designed to make your life easier.
Before diving into advanced features, let’s break down the basics to help you get started with confidence.
Understanding Shopify Themes
A Shopify theme controls how your online store looks and feels. It includes layout files, stylesheets, templates, and settings that define everything from homepage design to product pages. Themes can be customized using Liquid, Shopify’s template language, along with HTML, CSS, and JavaScript.
What is the Shopify Theme Development CLI?
In simple terms, the Shopify CLI is a command-line tool that allows you to interact with your theme code directly from your computer, without constantly logging into the Shopify admin. It streamlines the process of editing, previewing, and deploying themes.
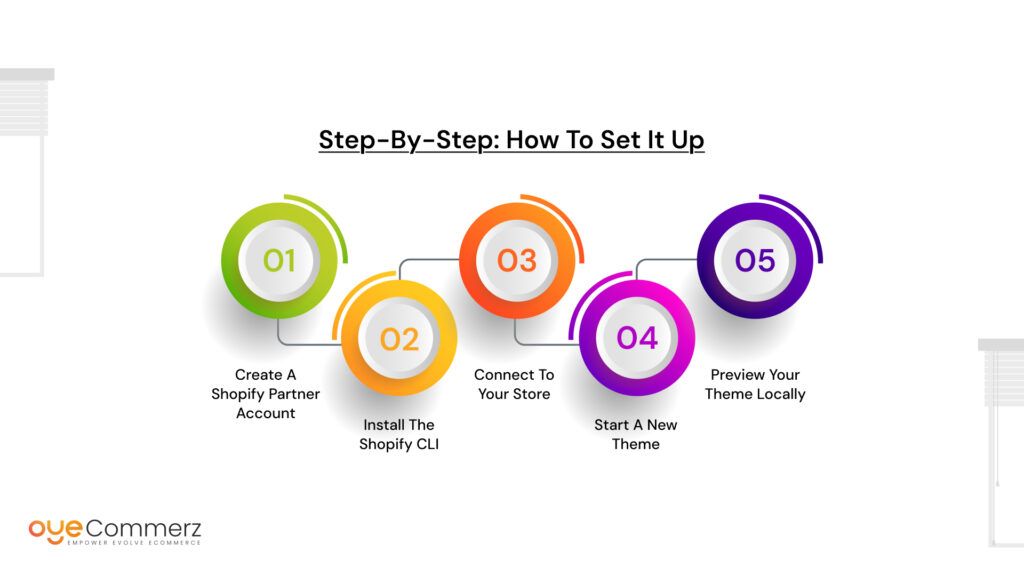
Step-by-Step: How to Set It Up
- Create a Shopify Partner Account To get started, create a free Shopify Partner account. This gives you access to development stores and tools needed for testing.
- Install the Shopify CLI You can install the CLI on macOS, Windows, or Linux. Shopify provides clear installation instructions, or you can use popular package managers like Homebrew or npm.
- Connect to Your Store Once installed, log in to your partner store using:
nginx
CopyEdit
shopify login
- Start a New Theme Initialize a theme (like Dawn) with:
csharp
CopyEdit
shopify theme init
- Preview Your Theme Locally Run a local server and see real-time changes with:
nginx
CopyEdit
shopify theme serve
CLI vs Manual Theme Editing: What’s the Difference?
Traditionally, editing a Shopify theme meant navigating the admin, downloading a theme, editing files, and uploading them again. With the CLI, you skip all that. You can push updates, pull changes, preview your store, and manage multiple versions—all from your terminal.
This tool isn’t just for developers. Even if you’re a solo store owner or agency beginner, the Shopify Theme Development CLI can help you work more efficiently and scale faster as your business grows.
Getting Started: For Beginners & E-commerce Newbies
If you’re new to e-commerce or just stepping into Shopify development, the Shopify Theme Development CLI might sound intimidating at first — but it’s actually designed to make your life easier.
Before diving into advanced features, let’s break down the basics to help you get started with confidence.
Understanding Shopify Themes
A Shopify theme controls how your online store looks and feels. It includes layout files, stylesheets, templates, and settings that define everything from homepage design to product pages. Themes can be customized using Liquid, Shopify’s template language, along with HTML, CSS, and JavaScript.
What is the Shopify Theme Development CLI?
In simple terms, the Shopify CLI is a command-line tool that allows you to interact with your theme code directly from your computer, without constantly logging into the Shopify admin. It streamlines the process of editing, previewing, and deploying themes.
Step-by-Step: How to Set It Up
- Create a Shopify Partner Account To get started, create a free Shopify Partner account. This gives you access to development stores and tools needed for testing.
- Install the Shopify CLI You can install the CLI on macOS, Windows, or Linux. Shopify provides clear installation instructions, or you can use popular package managers like Homebrew or npm.
- Connect to Your Store Once installed, log in to your partner store using:
nginx
CopyEdit
shopify login
- Start a New Theme Initialize a theme (like Dawn) with:
csharp
CopyEdit
shopify theme init
- Preview Your Theme Locally Run a local server and see real-time changes with:
nginx
CopyEdit
shopify theme serve
CLI vs Manual Theme Editing: What’s the Difference?
Traditionally, editing a Shopify theme meant navigating the admin, downloading a theme, editing files, and uploading them again. With the CLI, you skip all that. You can push updates, pull changes, preview your store, and manage multiple versions—all from your terminal.
This tool isn’t just for developers. Even if you’re a solo store owner or agency beginner, the Shopify Theme Development CLI can help you work more efficiently and scale faster as your business grows.
Shopify CLI in Action: Step-by-Step Commands
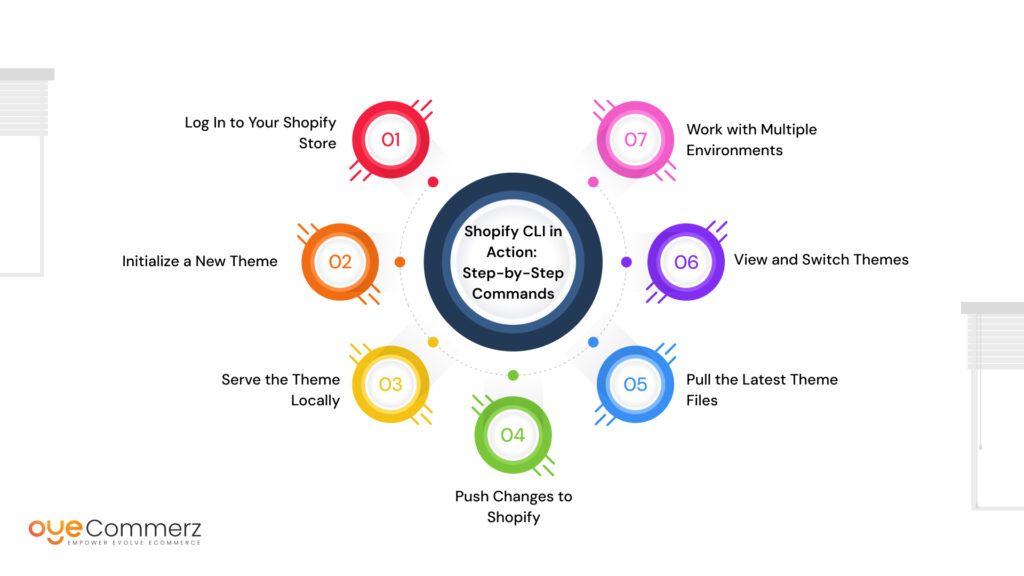
Now that you understand the basics, let’s walk through how the Shopify Theme Development CLI actually works in practice. Whether you’re starting from scratch or modifying an existing theme, these core commands will help you move faster and avoid manual errors.
1. Log In to Your Shopify Store
Before you can manage a theme, you need to connect your CLI to your store:
nginx
CopyEdit
shopify login
This opens a browser window and asks you to authenticate your Shopify Partner account or store credentials.
2. Initialize a New Theme
To start a new project, use:
csharp
CopyEdit
shopify theme init
This command lets you choose from available starter themes, such as Dawn, and sets up your development environment with all the necessary files.
3. Serve the Theme Locally
Preview your theme in real time as you make edits:
nginx
CopyEdit
shopify theme serve
This spins up a local development server where you can view changes instantly, including CSS tweaks, layout adjustments, and content edits.
4. Push Changes to Shopify
Once you’re satisfied with your edits, push them to your store:
perl
CopyEdit
shopify theme push
This uploads the local theme files to your Shopify store. You can also specify a live or unpublished theme.
5. Pull the Latest Theme Files
Need to sync the latest version from your store to your local setup?
nginx
CopyEdit
shopify theme pull
This ensures you’re working with the most up-to-date version of your theme.
6. View and Switch Themes
To list all available themes on your store:
nginx
CopyEdit
shopify theme list
And to preview or edit a specific theme:
lua
CopyEdit
shopify theme open –theme-id=XXXXXX
7. Work with Multiple Environments
You can configure multiple environments (like development, staging, and production) using flags or environment files, allowing you to manage changes across projects more effectively.
These commands form the foundation of any workflow using the Shopify Theme Development CLI. Whether you’re building a theme from scratch or customizing one for a client, mastering these will save hours and help avoid deployment mistakes.
Customizing Themes with CLI Like a Pro
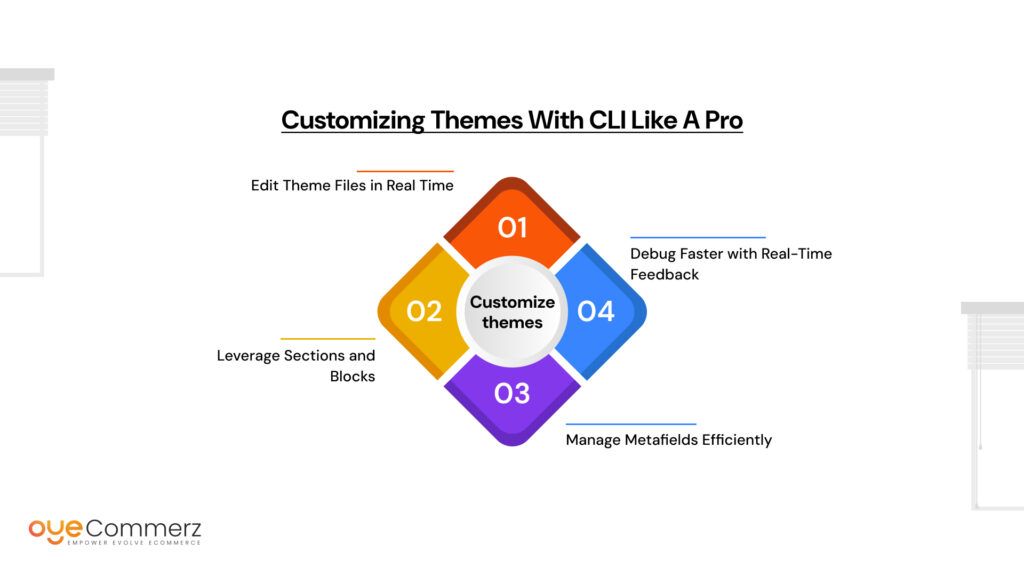
Once you’ve mastered the basics, the real power of the Shopify Theme Development CLI comes into play during customization. Whether you’re building a theme from scratch or modifying a prebuilt one, the CLI gives you full control over the theme’s structure, layout, and performance.
Here’s how to take your theme development to the next level.
Edit Theme Files in Real Time
When you run shopify theme serve, any changes you make to your theme files are reflected in the browser immediately. This includes:
- Liquid templates – Customize layouts, sections, and snippets.
- JSON templates – Control dynamic pages and support Shopify Online Store 2.0 features.
- CSS/SCSS/JS – Apply custom styles and scripts instantly.
You’re not just editing files—you’re testing live experiences as you build them.
Leverage Sections and Blocks
Shopify’s modern theme architecture is built around reusable, customizable components. With the CLI, you can easily:
- Create new sections and blocks to be used across templates.
- Modify existing components to adjust layout, content, or behavior.
- Manage schema settings to make themes user-friendly in the admin.
This allows merchants and clients to control content without touching code—while you maintain full flexibility behind the scenes.
Manage Metafields Efficiently
Metafields let you store custom data across products, collections, and more. Using the Shopify Theme Development CLI, you can reference these fields directly within your templates to personalize content and build tailored shopping experiences.
For example:
liquid
CopyEdit
{{ product.metafields.custom.ingredients }}
This keeps your theme lightweight while supporting advanced functionality.
Debug Faster with Real-Time Feedback
During development, the CLI automatically detects syntax issues and alerts you in the terminal. This reduces debugging time and helps you maintain cleaner, production-ready code throughout the process.
The Shopify Theme Development CLI empowers developers to move beyond static design and into dynamic, modular, and scalable theme builds. It bridges the gap between speed and customization, making it a must-have for anyone serious about building high-performance Shopify storefronts.
Contact to Migrate your Site to Shopify Now
Advanced CLI Features for Developers
For experienced developers or teams managing complex Shopify builds, the Shopify Theme Development CLI offers more than just basic commands. Its advanced capabilities enable cleaner workflows, faster deployment, and better collaboration across projects.
Here are some of the more technical, high-impact features worth mastering.
Integration with Git and Version Control
One of the biggest advantages of working with the CLI is seamless integration with Git. You can manage theme files just like any other codebase—track changes, branch your work, and collaborate without conflicts. Pairing the CLI with GitHub Actions or other CI/CD tools helps automate testing and deployments, improving code quality and reducing human error.
Environment Configuration and Multi-Store Management
If you’re handling multiple Shopify stores (such as development, staging, and production), the CLI supports store-specific environments. You can create .env files or use flags to connect to different stores without re-authenticating every time. This makes it easier to test features in isolation before pushing live.
Example:
bash
CopyEdit
shopify theme push –env=staging
Deploying Themes at Scale
Agencies or developers managing dozens of stores benefit from the CLI’s ability to script common tasks. You can automate theme uploads, schedule pulls for updates, or use batch commands to roll out changes across client stores.
Working with Hydrogen and Headless Architecture
As Shopify expands into headless commerce, the CLI is evolving to support Hydrogen—a React-based framework for building custom storefronts. While Hydrogen projects are managed slightly differently, the Shopify CLI provides tools for initializing and deploying headless builds as part of a modern stack.
This allows developers to deliver lightning-fast performance, deeper integrations, and fully decoupled front-end experiences—all while staying within Shopify’s ecosystem.
Theme Access Control
With the CLI, you can control which theme you’re pushing to—live, unpublished, or backup. This ensures changes are only applied where intended, helping prevent accidental overrides on production themes.
These advanced features make the Shopify Theme Development CLI a powerful ally in modern theme development. It’s not just a tool for pushing code—it’s the foundation for scalable, maintainable, and production-ready Shopify projects
Comparison Table – Shopify Theme Development CLI vs Other Tools
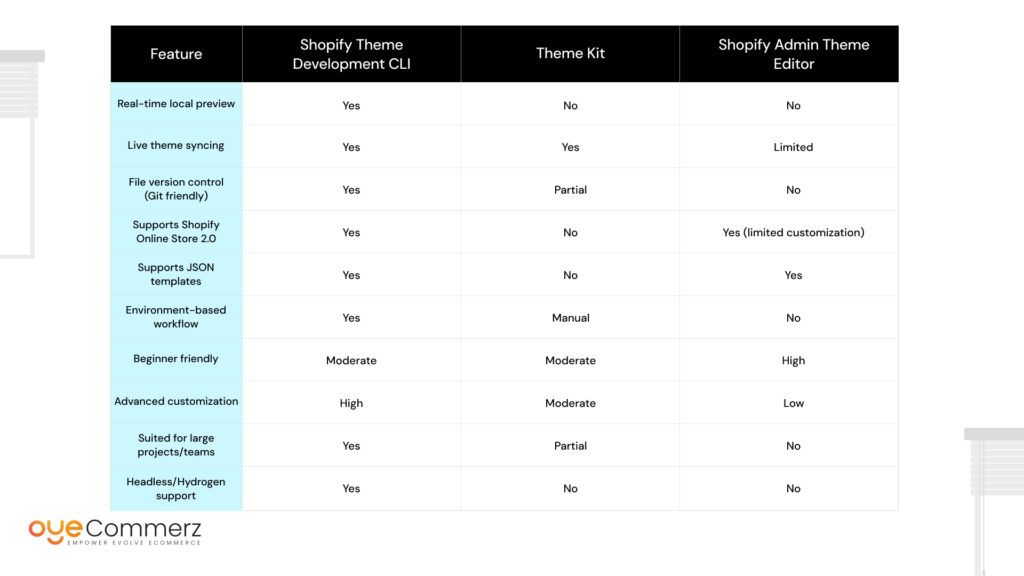
To truly understand the value of the Shopify Theme Development CLI, it’s helpful to compare it against other popular approaches like Theme Kit and the traditional Shopify Admin Theme Editor. Each has its place, but the CLI is built for modern workflows and scalable development.
Key Takeaways:
- The Shopify Theme Development CLI offers the most comprehensive features for professional developers and teams.
- Theme Kit may still serve basic development needs but lacks support for newer Shopify features.
- The Shopify Admin Editor is simple but limited in customization, version control, and efficiency.
For those looking to scale their store or manage multiple client projects, the CLI is clearly the best long-term solution.
Conclusion
The Shopify Theme Development CLI is more than just a convenience tool—it’s a game-changer for developers, agencies, and growing brands looking to build faster, smarter, and more scalable Shopify storefronts. From setting up your first theme to deploying advanced customizations, the CLI streamlines the entire workflow and gives you complete control over your development process.
If you’re still relying on manual theme uploads or basic admin edits, you’re leaving efficiency—and performance—on the table. Embracing the Shopify CLI means cleaner code, faster iteration, and a more professional development experience.
Whether you’re just starting out or looking to upgrade your development stack, now is the time to master the Shopify Theme Development CLI and bring your e-commerce projects to the next level.
Frequently Asked Questions
The Shopify Theme Development CLI is a command-line tool that helps developers build, preview, and manage Shopify themes more efficiently. It allows for real-time local editing, theme syncing, Git integration, and faster deployment—making it ideal for both solo developers and teams.
Yes, especially for modern Shopify development. The Shopify CLI supports Online Store 2.0, JSON templates, live preview, and custom development workflows, which Theme Kit does not. It’s also more compatible with headless builds and Hydrogen.
While the CLI is built with developers in mind, beginners can use it after a short learning curve. Shopify provides good documentation, and once set up, it simplifies many tasks compared to manual theme editing.
You’ll need Node.js installed, a terminal or command line interface, and access to a Shopify Partner account or store. The CLI works on macOS, Windows, and Linux environments.
Yes. You can switch between stores using different environments and manage multiple themes through CLI commands like shopify theme list, theme push, and theme pull.
While not mandatory, it’s highly recommended. The Shopify Theme Development CLI dramatically improves speed, accuracy, and workflow when building or customizing themes, especially for larger or more complex stores.