
Research shows that Shopify powers over 10% of the global eCommerce market, making it one of the most trusted platforms for online businesses. Many entrepreneurs start with Squarespace for its simple interface and elegant design. However, as their business grows, they realize the need for a more robust and scalable platform, leading them to Shopify. Shopify offers advanced eCommerce features, better flexibility, and seamless management, making it the ideal choice for expanding businesses.
But migrating your domain from Squarespace to Shopify is a crucial step that requires careful handling. A poorly executed transfer can lead to SEO issues, downtime, and loss of customer trust. To ensure a seamless transition, it’s essential to follow the right process.
Migrating your domain from Squarespace to Shopify might sound complicated, but with the right steps, you can ensure a smooth transition without losing traffic or compromising your brand identity. This guide will walk you through the entire process in a simple and straightforward manner, helping you transfer Squarespace domain to Shopify effortlessly.
Table of Contents
ToggleWhy Move Your Domain from Squarespace to Shopify?
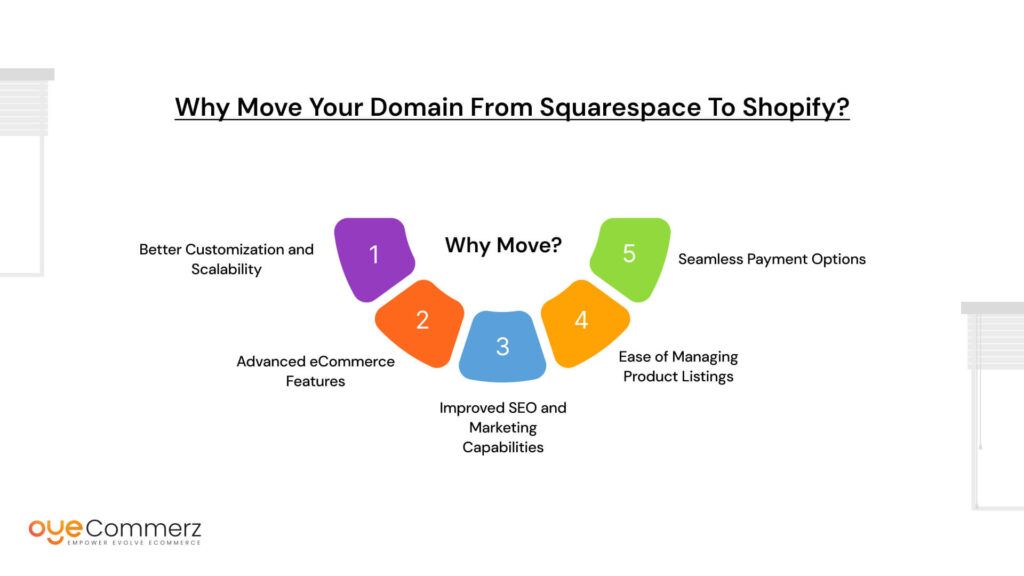
Better Customization and Scalability
As your business grows, so do your needs. Squarespace is great for basic websites, but Shopify offers unmatched flexibility and scalability. You can customize your store’s design, functionality, and customer experience to suit your brand as it evolves.
Advanced eCommerce Features
Shopify is built for eCommerce, offering advanced features that Squarespace lacks. With Shopify, you can manage multi-channel sales, customize checkout processes, and integrate with third-party apps effortlessly. This makes scaling easier and improves the overall shopping experience.
Improved SEO and Marketing Capabilities
Shopify provides powerful SEO tools that help your store rank higher in search engines. It also offers built-in marketing features like abandoned cart recovery and email marketing integrations, ensuring higher conversion rates.
Ease of Managing Product Listings
Managing a growing inventory can be tedious, but Shopify simplifies this with an intuitive dashboard. Adding, editing, and categorizing products becomes effortless, saving you valuable time.
Seamless Payment Options
Shopify supports a wide range of payment gateways, including PayPal, Stripe, and Apple Pay, ensuring smooth and secure transactions for your customers. You also get access to Shopify Payments, which eliminates third-party transaction fees.
Pre-Migration Checklist: Things to Do Before Starting
Backup Your Squarespace Data
Before initiating the transfer, export all essential data from Squarespace. This includes product listings, customer information, and order history. Having a backup ensures that no critical information is lost during the migration.
Review DNS Settings
Check your current DNS settings in Squarespace to ensure they are correctly configured. Misconfigured DNS records can cause delays or errors after the domain transfer. Note the A record, CNAME, and MX records for easy reference during reconfiguration.
Disable SSL Certificate Temporarily
To avoid conflicts during the transfer, temporarily disable the SSL certificate on Squarespace. Once the migration is complete, re-enable SSL on Shopify to secure your store and protect customer data.
Note Down Email Hosting Settings
If you’re using a custom email address associated with your domain (e.g., through Google Workspace or Zoho Mail), note down the email settings. Update these settings on Shopify after the transfer to prevent disruption in email services. Failing to reconfigure these settings may result in missed customer inquiries or order confirmations.
Check Domain Lock Status
Ensure that your domain is unlocked in Squarespace before initiating the transfer. A locked domain prevents any transfer requests from being processed. You can do this by navigating to your domain settings and verifying its status.
Obtain Authorization Code (EPP Code)
To transfer your domain, you’ll need an authorization code, also known as the EPP code. Request this code from Squarespace and keep it handy as you’ll need it during the Shopify setup.
Inform Your Customers
If your store experiences any downtime during the transfer, inform your customers in advance. This helps manage expectations and maintains trust, ensuring a smooth transition.
A smooth migration requires careful preparation, so double-checking these essentials can save you from unnecessary hiccups. Properly managing each step will help ensure your domain transfer is seamless and error-free.
Step-by-Step Guide to Transfer Squarespace Domain to Shopify
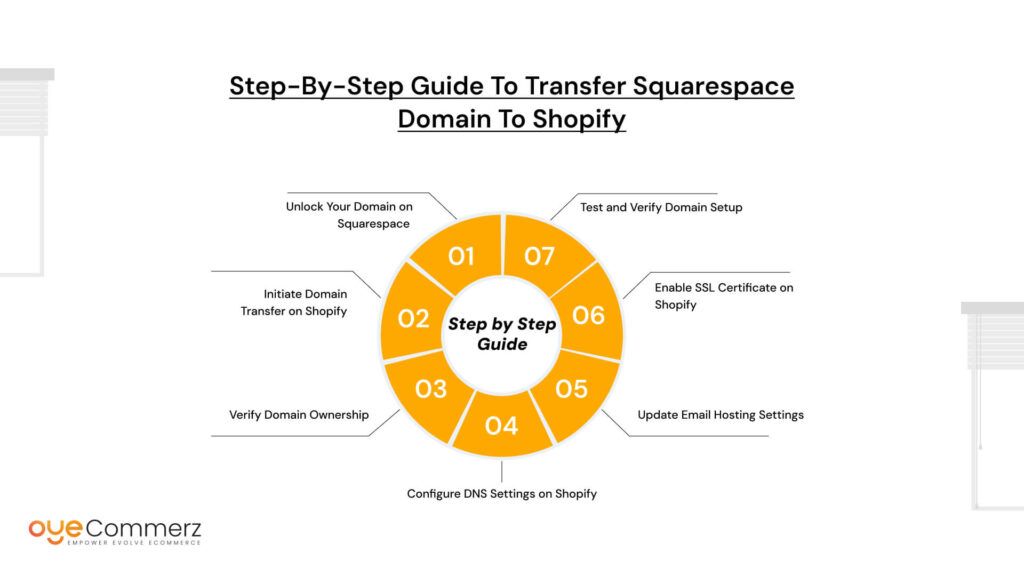
Step 1: Unlock Your Domain on Squarespace
The first step is to unlock your domain in Squarespace to prepare it for transfer. Start by logging into your Squarespace account and navigating to Settings > Domains. From the list of domains, select the one you want to transfer.
Once you’ve selected the domain, scroll down and look for the option labeled Unlock Domain. Click on it to disable the domain lock. This step is essential because a locked domain cannot be transferred to another provider.
After unlocking the domain, the next step is to obtain the authorization code (EPP code). You’ll find this code in the same domain settings section. Copy and save it, as you’ll need to enter this code when initiating the transfer on Shopify.
Double-check that your contact information, especially the admin email address, is correct. The authorization email and verification link will be sent to this address. Keeping it updated ensures that you don’t miss any critical notifications.
Step 2: Initiate Domain Transfer on Shopify
Now that you have unlocked your domain and copied the EPP code, it’s time to begin the transfer on Shopify.
Log in to your Shopify Admin Panel and navigate to Settings > Domains. Click on Connect Existing Domain and select Transfer Domain. Enter your Squarespace domain name and click Next.
On the next screen, you’ll be prompted to enter the authorization code (EPP code) that you copied from Squarespace. Paste the code into the required field and proceed with the transfer.
Shopify will notify you about any applicable transfer fees. Most domain transfers require a one-time fee, but this typically includes an additional year of domain registration. Review the details and click Approve Transfer to initiate the process.
Domain transfers can take anywhere from 24 hours to 7 days to complete. During this time, your website and email services should remain functional as long as the DNS settings are properly configured.
Once the transfer is initiated, Shopify will send a confirmation email to the domain owner’s email address. Make sure to approve this request promptly to avoid any delays in the process.
Step 3: Verify Domain Ownership
After initiating the transfer, it’s essential to verify your domain ownership. This step ensures that the domain is being transferred by the rightful owner.
Check the email associated with your domain for a domain transfer confirmation email. This email is usually sent within a few minutes after initiating the transfer. Open the email and click on the verification link provided to confirm the transfer request.
If you don’t receive the email within a few hours, check your spam or junk folder. Sometimes, domain transfer emails may be flagged incorrectly. If the email is not found, verify that the admin email address on your domain record is correct and matches the contact details you used during the transfer initiation.
Once you click the verification link, the transfer process begins. Depending on your domain registrar and the domain extension (.com, .net, etc.), the transfer may take up to 7 days to complete. During this period, avoid making any changes to the domain settings or DNS records to prevent any interruptions.
Upon successful completion of the transfer, Shopify will notify you via email, confirming that your domain is now active on your Shopify store.
Step 4: Configure DNS Settings on Shopify
Once the domain transfer is complete, the next critical step is to configure your DNS settings correctly on Shopify after you transfer Squarespace. DNS settings direct traffic to your new store and ensure that your domain resolves properly.
Log in to your Shopify Admin Panel and navigate to Settings > Domains. Select the transferred domain and click Manage.
To configure DNS settings, update the following records:
- A Record: Points to Shopify’s IP address (23.227.38.65).
- CNAME Record: Directs traffic from your store to your primary Shopify domain.
If you had any custom DNS records configured in Squarespace (such as for email or third-party services), re-enter these settings in Shopify. This prevents service disruptions after the transfer.
DNS changes can take 24 to 48 hours to propagate globally. During this period, your domain may temporarily point to the old site or show errors. Be patient and monitor the changes before making further adjustments.
After updating the DNS settings, verify that your domain points to the correct Shopify store and all traffic is being directed properly.
Step 5: Update Email Hosting Settings
If you’re using a third-party email service such as Google Workspace or Zoho Mail with your domain, it’s important to update your email hosting settings in Shopify after you transfer Squarespace domain to Shopify.
Log in to your Shopify Admin Panel and go to Settings > Domains. Select the domain you’ve just transferred and update the MX records to point to your email hosting provider.
To ensure that your email services remain uninterrupted, double-check that the MX records, SPF, and DKIM settings are correctly configured. This step prevents potential disruptions in receiving customer inquiries and order notifications.
Important Note:
If the email settings are not updated correctly, emails sent to your custom domain may bounce or fail to be delivered. Verifying the accuracy of these settings helps maintain seamless communication with your customers.
Once the DNS changes have fully propagated, test the email functionality by sending and receiving test emails to ensure everything works as expected.
Step 6: Enable SSL Certificate on Shopify
To ensure secure browsing and protect customer data, it’s crucial to enable an SSL certificate on your Shopify store after the domain transfer is complete.
Log in to your Shopify Admin Panel and go to Online Store > Domains. Select your newly transferred domain and look for the option to Activate SSL.
Enabling SSL ensures that your store uses HTTPS instead of HTTP, adding an extra layer of security for transactions and sensitive data. SSL certificates also boost your search engine rankings, as Google favors HTTPS websites in search results.
It may take a few hours for the SSL certificate to be fully activated after enabling it. During this period, some visitors may encounter a security warning. To avoid this, wait until the SSL activation is confirmed before promoting your website.
After SSL is enabled, verify that all pages load securely and check for the padlock icon in the browser address bar, indicating that your site is now secure.
Step 7: Test and Verify Domain Setup
After completing the domain transfer and configuration, it’s important to test and verify that everything works perfectly.
Start by visiting your domain in a web browser to ensure that it redirects correctly to your Shopify store. Verify that the homepage and all product pages load without any errors.
Next, test the checkout process to confirm that customers can add items to their cart and complete purchases without any glitches. Check that payment gateways, shipping options, and tax calculations are working correctly.
Additionally, ensure that 301 redirects are in place for any old URLs from Squarespace. This prevents broken links and maintains your search engine rankings.
Finally, check your email functionality by sending and receiving test emails. Confirm that order notifications and customer inquiries are delivered as expected after you migrate your eCommerce with an app.
Common Errors and How to Fix Them
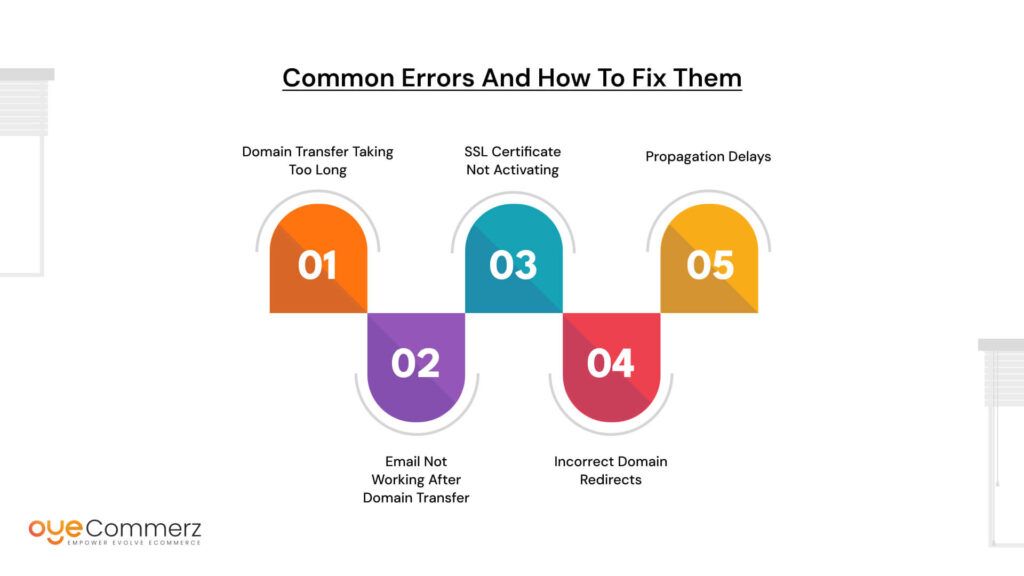
Domain Transfer Taking Too Long
Transfer Squarespace can take anywhere between 24 hours to 7 days. However, if the process is delayed beyond this period, it’s likely due to a locked domain or an invalid authorization code. To fix this, ensure that the domain is unlocked in Squarespace before initiating the transfer. Additionally, verify that the EPP (authorization) code is correctly entered during the transfer process.
Email Not Working After Domain Transfer
Email disruptions are a common issue after transferring a domain. This usually happens when the MX records are not updated correctly. To fix this, log in to your Shopify Admin Panel and update the MX records to point to your existing email provider (such as Google Workspace or Zoho Mail). Double-check that SPF and DKIM settings are also configured properly to prevent email delivery failures.
SSL Certificate Not Activating
After transferring your domain, Shopify automatically issues an SSL certificate. However, if it doesn’t activate, the problem may be due to DNS propagation delays. Allow 24 to 48 hours for the DNS changes to fully propagate. If the SSL still doesn’t activate, re-enable it by navigating to Online Store > Domains and clicking Activate SSL.
Incorrect Domain Redirects
Incorrect redirects can lead to broken links and affect SEO rankings. Double-check your DNS configurations and ensure that A records and CNAME records are pointing correctly to Shopify. Also, confirm that 301 redirects have been properly set up to redirect old URLs to their new locations on Shopify.
Propagation Delays
DNS propagation may take 24 to 48 hours after updating DNS records. During this period, users may encounter inconsistencies when accessing your website. Be patient and avoid making additional changes during propagation. If the issue persists after 48 hours, contact Shopify support for assistance.
SEO Considerations During Domain Migration
Minimize Downtime to Prevent Traffic Loss
Downtime during migration can affect search engine rankings and disrupt customer experience. To minimize this, schedule the migration during low-traffic hours, typically during nighttime or off-peak periods. Inform your customers in advance to manage their expectations and reduce the impact on traffic.
Set Up 301 Redirects
Setting up 301 redirects is essential to maintain SEO equity after domain migration. Redirect all old URLs from Squarespace to their respective pages on Shopify. This ensures that search engines and visitors are automatically directed to the correct pages, preserving your SEO rankings.
Update Google Search Console
Once the transfer Squarespace is complete, update your site information in Google Search Console. Add the new domain as a property and submit a new sitemap to help Google crawl and index your pages faster. This step helps search engines recognize the new domain and update search results accordingly.
Monitor Traffic and Search Rankings
Keep a close eye on your website traffic and search rankings after migration. Use tools like Google Analytics and Google Search Console to monitor any changes. Watch for drops in traffic, crawl errors, or 404 pages, and address them promptly to avoid long-term SEO damage.
Optimize Internal Links and Content
After migration, review your internal links and update them to point to the new Shopify URLs. Double-check that all images, product pages, and blog posts are linked correctly to avoid broken links and enhance user experience.
Benefits of Migrating to Shopify
Seamless User Experience
Shopify offers a fast, responsive, and mobile-friendly experience that enhances customer satisfaction. With optimized page speeds and intuitive navigation, your customers can easily browse and complete purchases without delays. Faster load times also contribute to better search engine rankings and reduced bounce rates.
Advanced Analytics and Reporting
Shopify’s built-in analytics and reporting tools provide valuable insights into customer behavior, sales trends, and conversion rates. You can track product performance, identify high-converting pages, and refine your marketing strategies to maximize profits. Access to detailed reports empowers you to make data-driven decisions that drive growth.
Enhanced Payment Security
Security is a top priority for eCommerce stores. Shopify is PCI-DSS Level 1 compliant, ensuring that all transactions are encrypted and secure. This protects sensitive customer information and minimizes the risk of data breaches. Shopify also supports multiple payment gateways, providing customers with a variety of secure payment options.
Access to a Robust App Ecosystem
One of Shopify’s biggest advantages is its extensive app ecosystem. With thousands of apps available in the Shopify App Store, you can extend your store’s functionality to meet your unique business needs. Whether it’s integrating email marketing tools, enhancing SEO, or automating inventory management, Shopify apps make it easy to customize and optimize your store.
Scalability for Future Growth
As your business grows, Shopify scales effortlessly to accommodate increased traffic and sales volume. Unlike Squarespace, which may struggle to handle complex eCommerce operations, Shopify’s robust infrastructure allows you to expand your store without worrying about performance limitations. You can add new products, manage large inventories, and explore international markets with ease.
Migrating to Shopify opens the door to a more streamlined, secure, and scalable eCommerce experience. By leveraging Shopify’s powerful features, you can set your business up for long-term success and growth.
Post-Migration Checklist: What to Do After Transfer Squarespace
Test Website Functionality
After completing the domain transfer, thoroughly test your website to ensure that everything works correctly. Check product listings, payment gateways, and customer accounts. Make sure that customers can browse, add items to their cart, and complete transactions smoothly. Also, verify that third-party integrations, such as inventory management systems or email marketing tools, are functioning properly.
Verify SEO and URL Redirects
Properly configured 301 redirects are essential to preserve SEO rankings after migration. Test a few old URLs to confirm they redirect to the corresponding pages on Shopify. If any URLs return a 404 error, update the redirect settings immediately. This step helps maintain search engine visibility and ensures that visitors are directed to the correct pages.
Reconnect Email Accounts
If you use a third-party email provider such as Google Workspace, verify that the email accounts are working correctly after updating DNS records. Send and receive test emails to confirm that messages are being delivered without delay. Also, check SPF and DKIM settings to prevent emails from landing in spam folders.
Monitor Traffic and Analytics
Keep an eye on website traffic and user behavior after the transfer Squarespace. Use Google Analytics and Google Search Console to track traffic patterns and identify any unexpected drops. Monitoring performance will help you spot and resolve issues quickly, ensuring a seamless experience for your customers.
Troubleshooting Tips After Domain Transfer
Domain Not Resolving?
If your domain is not resolving or showing errors, double-check the DNS settings in your Shopify Admin Panel. Confirm that the A record is pointing to Shopify’s IP address (23.227.38.65) and the CNAME record is correctly configured. DNS propagation may take 24 to 48 hours globally, so wait patiently before making additional changes.
Email Issues?
If emails are not being delivered after migration, verify that the MX records and other DNS settings are updated correctly. Check that the MX records point to your email provider and that SPF and DKIM records are properly configured. Sending and receiving test emails can help identify configuration errors.
SSL Not Enabled?
If SSL (Secure Socket Layer) is not enabled after the transfer, wait for DNS propagation to complete before activating it. Once DNS changes have propagated, log in to your Shopify Admin Panel, go to Online Store > Domains, and click Activate SSL. SSL certificates ensure secure browsing and improve search engine rankings.
Slow Page Load Times?
If your Shopify store is loading slowly after migration, check for any unoptimized images or broken links. Review third-party apps that may be slowing down your store and optimize page performance where necessary.
Ready to make the switch?
Start your journey by transferring your domain to Shopify today with Oyecommerz and unlock new growth opportunities. With Shopify’s powerful tools and easy-to-use platform, you can take your eCommerce business to the next level.Don’t wait! Contact us today
Take the first step toward building a stronger online presence today.
Contact to Migrate your Site to Shopify Now
Conclusion
Migrating your domain from Squarespace to Shopify is a critical step that can significantly enhance your eCommerce store’s performance. A smooth transfer Squarespace domain to Shopify helps preserve SEO rankings, prevents downtime, and ensures a seamless experience for your customers. By following the right steps, unlocking the domain, configuring DNS settings, and verifying redirects, you can prevent common errors and maintain your store’s reputation.
Migrating from Squarespace to Shopify is a strategic move that positions your business for long-term success. Shopify’s advanced features, scalability, and secure infrastructure provide the perfect foundation to grow your online store and meet evolving customer demands.